Workflow - Approved
Content should be approved by PM/Dev/Product before it's added to any of the projects.
NOTE: All Documentation Team members belong to the doc_checkouts Slack channel, where we post information about what is being worked on and what needs review. Use the @doc command to notify the team that you are checking out a branch and to request a peer review.
TWs add approved content in Flare and are responsible for producing Author Notes for the content.
TWs also stage content in a dev environment for the Tech Writer Peer Review.
At a high level, to add approved content to the Flare projects for SST, SKP and the Installation Guides:
-
The Author posts in the Slack doc_checkouts channel when checking out a branch.
NOTE: Include the name of the project and the name of the branch you are working in in this post. Use the @doc command in Slack to call attention to questions and feedback needed.
-
TW checks out their own branch to add content on a local branch and makes changes
-
Author builds the help in jenkins so that it is accessible on the dev site.
NOTE: For SKP help, pushing content to develop automatically starts a build in jenkins called ‘CloudDocsDev’ to push the new content to the dev site. There is no need to access jenkins when updating SKP help (unless to check for failure issues). Refer to Merge the Develop Branch to the Master Branch for details of pushing from develop to master.
-
Author posts in the doc_checkouts Slack discussion channel when they have merged the PR to develop_nnn/develop/Staginginnn, and built in jenkins so that the content is on the dev site ready to be peer reviewed by a Doc Team member..
NOTE: Include a link to the Author Notes in this post. Use the @doc command in Slack to call attention to questions and feedback needed.
Author checks out branch to add content
NOTE: If you are a new employee or setting up a new laptop, consult GitHub Initial Setup for initial configuration and setup steps for Git and GitHub.
NOTE: Always use Git Bash. Do not use the GitHub Desktop application.
NOTE: You MUST perform these steps each time you checkout a branch to ensure you are working in the latest copy of the release branch.
-
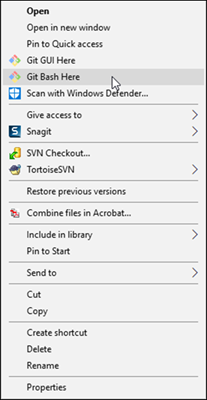
In Windows-Explorer, right-click your local repo folder and select Git Bash Here.

Right-click menu with Git Bash Here option.
NOTE: If pulling down a branch for the first time, enter the git command git fetch origin <release branch name>, then proceed with the following steps.
-
Enter the git command git checkout <release branch name> (SST: develop_nnn, SKP: develop, Install Manual: Stagingnnn).
-
Enter the git command, git pull origin <same release branch name>
NOTE: To see a list of branches that are available in your local repo, enter the command git branch. All of the available local branches are listed.
NOTE: If you are working on a big project where you perform several check-ins before opening a Pull Request, use the following commands each time you begin work:
git status <your branch name>
git checkout <your branch name>
git pull origin <your branch name>
-
Enter the command git checkout -b <new branch name>
NOTE: Name the branch after the JIRA ticket number if applicable. Use the naming convention DSP-NNNN. If changes are not related to a Jira ticket, give the branch a meaningful name, such as ‘releasenotesupdates’.
-
Open the project in Flare and make your updates. Your updates are saved in the <new branch name>.
-
When you finish your updates, save your changes and close Flare.
NOTE: Refer to Update Online Help in Flare for steps on working in Flare.
Author Pushes Updates to github Repo and Merges Content to develop_nnn/develop/Stagingnnn
After finishing your changes in Flare, commit them to the remote repo for the project following these steps:
-
In Windows-Explorer, right-click your local repo folder and select Git Bash Here.

Right-click menu with Git Bash Here option
-
Enter the git command git status to see all of the changes you have made.
NOTE: If you do not see your changes, you may have forgotten to save or you are in the wrong branch.
-
Stage the updates for commit by entering the git command git add .
NOTE: Include the period in the command.
NOTE: Comments change from red to green after you stage them.
-
Commit staged updates by entering the command git commit -m "<commit message that informs everyone what you have done>"
NOTE: Do not use special characters in message.
-
Push your changes to the remote by entering the command git push origin <new branch name>.
-
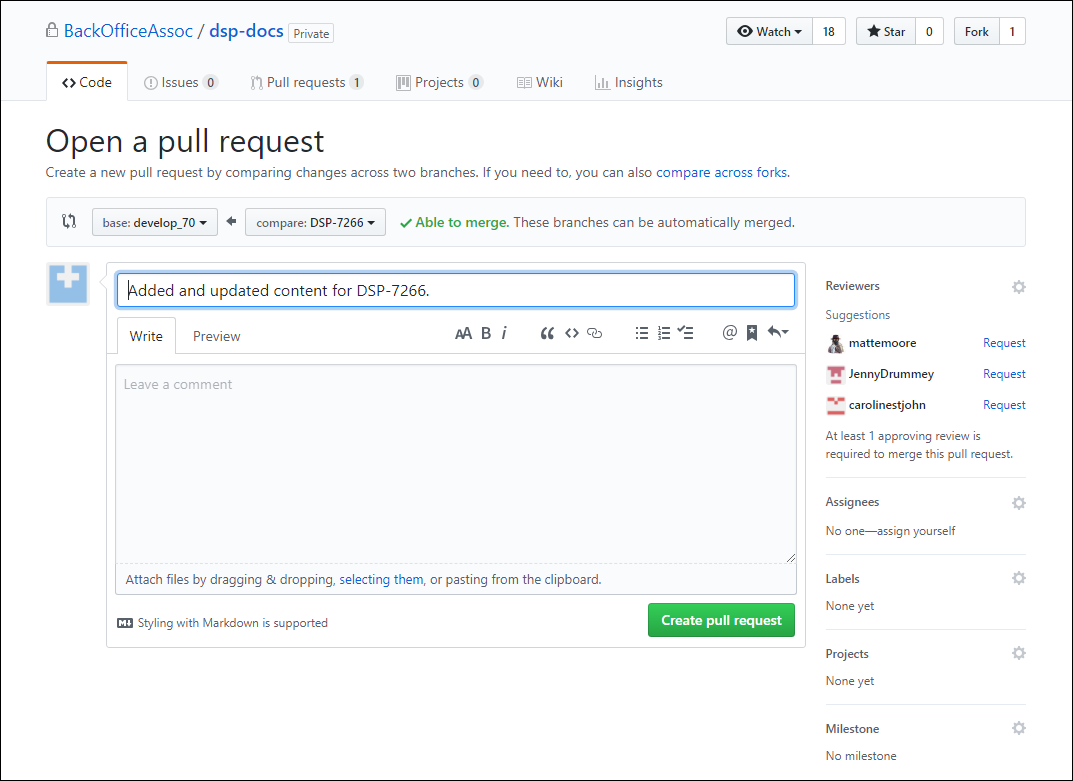
Go to GitHub.com and access the appropriate repo.
-
Click the Compare and pull request button next to your recently pushed branch.
-
Make sure the base is the current release branch you are working in (SST: develop_nnn, SKP: develop, Install Manual: Stagingnnn) and compare is your new branch name.

-
Add link to Author Notes in the description of the PR.
-
Click the Create pull request button.
-
Click the Merge then Confirm Merge buttons.
-
Build SST help and the Installation Manuals in the dev environment in jenkins. Refer to Update Help on the Dev and Prod Sites for steps for working in Jenkins.
NOTE: For SKP help, pushing content to develop automatically starts a build called ‘CloudDocsDev’ to build the new content in the dev site. There is no need to access jenkins when updating SKP help (unless to check for failure issues). Refer to Merge the Develop Branch to the Master Branch for details of pushing from develop to master.
-
Update the Documentation Status on the JIRA tickets associated with the work to Peer Review.
-
Notify the doc team that you are ready for a peer review by posting an @doc message in the #doc_checkouts Slack channel. Include a link to your Author's Notes.
Author Notes
NOTE: Author Notes should only contain approved content or formatting fixes/help housekeeping that does not require approval.
Author Notes must contain:
-
A list of any Back End changes you made and what you did. These are changes in Flare that the user does not see, but that TWs need to know about
-
A list of Front End changes, with links to the approved googledoc that tracks the edits or the Jira ticket with the approved content and a link to the topic on the dev site where the changes were made.
-
Jira ticket number as relevant.
-
Simple, clear and easy to follow content describing the work done for the ticket.
NOTE: Author Notes must not contain explanations or background for tickets, contents, or troubleshooting. If you find a “gotcha” or a tip, share it in a slack channel so we can all learn from it, and add it to the standards/processes if it’s relevant.
